
Ontario Fireplace & Chimney Specialists
Fireplace Refacing in St. Catharines
New face, same fireplace, clearances still correct.
Every job starts with a proper look at your system — not a guess over the phone. You get a written quote before any work begins, a clear explanation of what we found, and a technician who works to manufacturer and code requirements from start to finish.
- Written quotes, no surprise charges
- Photo-backed findings after every visit
- Work performed to code and manufacturer specs
- Serving St. Catharines and Niagara Region, year-round
Fireplace Refacing for St. Catharines homes
St. Catharines has extensive pre-war and post-war brick housing with masonry chimneys, and lake-influenced humidity keeps those structures damp for much of the year.
Crown cracking and cap failure lead our Niagara work by a wide margin. Getting water off the top of the structure is usually the highest-value spend on a chimney in this area.
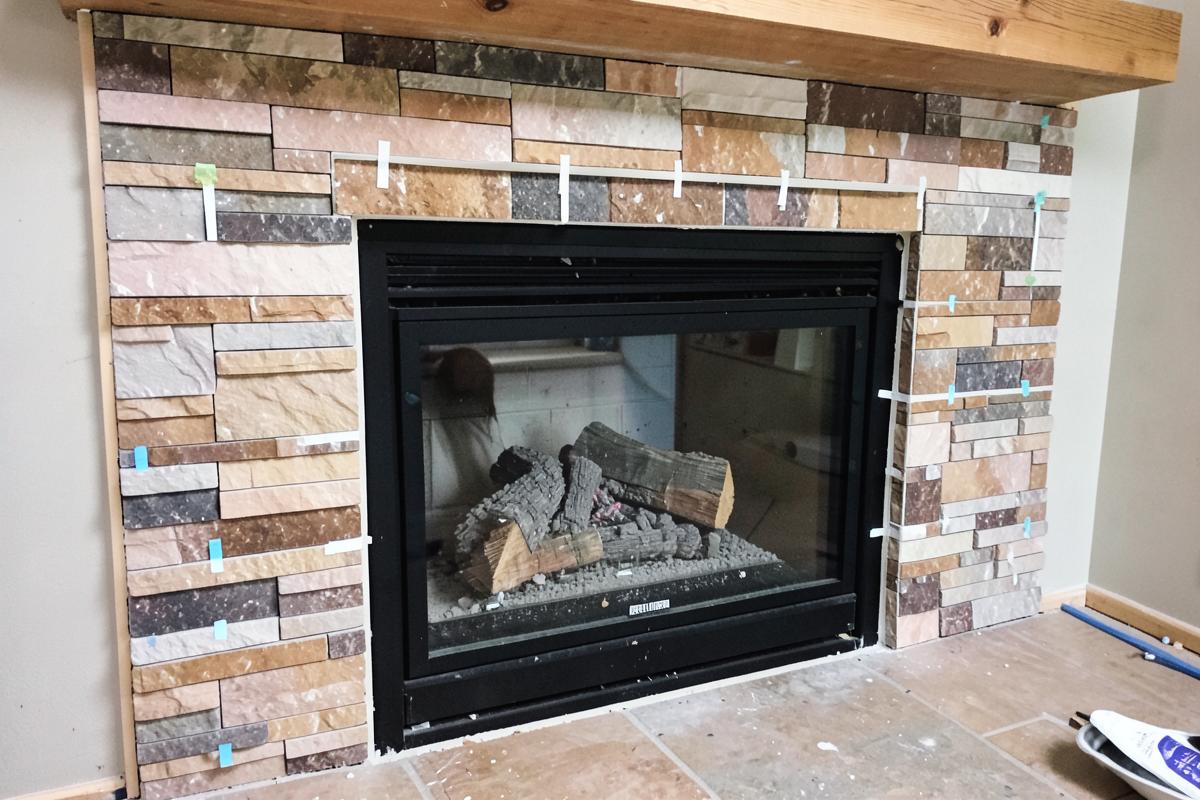
Refacing changes how the fireplace reads in the room without touching the appliance or the venting. Stone veneer, porcelain slab, tile, limewash and plaster all give completely different results on the same firebox.
The constraint is what may sit within the appliance's non-combustible zone. We plan substrate, backer board and trim so the finish you want is achievable inside that zone, and we detail the hearth to match rather than as an afterthought.
What the visit includes
- Existing surround and substrate assessment
- Material selection within clearance requirements
- Non-combustible backer and substrate preparation
- Stone, tile, slab or plaster installation
- Hearth, trim and finish detailing
Signs you need this
- A dated brick or tile face you no longer like
- Painted brick that is peeling or patchy
- A new appliance behind an old surround
- Cracked or loose surround tiles
Areas we cover around St. Catharines
Port Dalhousie · Merritton · Grantham · Western Hill · Glendale
Refacing a fireplace means changing the visible surround and hearth finish, tile, brick, stone veneer, paint, or a full material swap, without altering the firebox or the chimney behind it. It is one of the highest-impact, lowest-disruption renovations available for a room built around a fireplace, since the appliance itself keeps working exactly as it did while the entire visual character of the wall changes.
Ontario homes built across several decades carry a wide range of original fireplace finishes, from 1970s-era rough-faced fieldstone and dark-stained brick to 1990s formal marble-look tile surrounds, and tastes have shifted considerably since most of those were installed. Refacing lets a homeowner update that look, often to a cleaner, lighter stone veneer or a simple painted brick finish, without the cost and disruption of removing and rebuilding the firebox structure underneath.
The scope of a refacing project ranges widely, from a straightforward paint or whitewash treatment over existing brick that can be done in a day, to a full veneer replacement that involves removing the old surface down to a solid substrate and building up a new stone or tile finish layer by layer. What is possible on a given fireplace depends heavily on the condition and type of the existing surface, which is where most refacing projects start.
Assessing what is underneath the current finish
Before any refacing material goes up, the existing surround needs to be evaluated for what it actually is structurally, since a stone veneer surface might be a thin manufactured product over a wood-framed chase, or genuine full-depth masonry, and those two substrates take entirely different approaches to adding a new finish over them.
Cracked or loose tile, delaminating thin stone veneer, or brick with significant mortar joint deterioration all need remediation before new material is applied over top, because refacing over a failing substrate simply hides a problem rather than fixing it, and the new finish will often crack or fail again in the same spots within a year or two.
A moisture check is worthwhile on any surround showing staining, efflorescence, or a musty smell, since those signs sometimes point to a chimney flashing or crown issue allowing water into the wall behind the surround, and that water source needs to be resolved before new finish material is installed, or the new surface will show the same staining again.
Paint and whitewash as a lighter-touch option
Painting or whitewashing existing brick or stone is the least invasive refacing option and can transform a dark, dated surround into a bright, updated feature in a single day for a fraction of the cost of a full veneer replacement. Masonry-specific primer is essential here, since standard interior wall primer does not bond reliably to the porous, uneven surface of brick or stone and tends to peel within a season or two of heat exposure near the firebox.
Whitewashing, which allows some of the brick texture and colour variation to show through a translucent limewash or diluted paint mixture, has become a particularly popular Ontario trend for updating older red or brown brick fireplaces without fully hiding the material's character, and it can typically be reversed or refreshed more easily than a solid opaque paint coat if tastes change again later.
Heat-rated paint formulated for direct firebox proximity should be used on any surface within the appliance's clearance zone, since standard latex paint can discolour or off-gas when exposed to sustained heat close to an active firebox opening.
Stone and tile veneer replacement
A full veneer replacement strips the existing surface back to a sound substrate, whether that is the original masonry, a cement board underlayment installed for the purpose, or wood framing that needs cement board added before veneer can be applied. Manufactured stone veneer, which is lighter and less expensive than natural cut stone, has become the dominant choice for Ontario refacing projects because it installs faster and offers a wide range of colour and texture options that mimic natural stone closely.
Natural stone veneer, thin-cut slices of real stone rather than a manufactured composite, costs more and weighs more, sometimes requiring additional structural support consideration on a wood-framed chase, but offers colour depth and texture variation that some homeowners specifically want over the more uniform look of manufactured products.
Large-format porcelain tile has also become popular for a cleaner, more modern surround look, particularly in contemporary renovations, and it installs using standard tile-setting methods with heat-rated thin-set and grout appropriate for proximity to a firebox opening.
- Manufactured stone veneer: lighter, less expensive, wide colour range
- Natural stone veneer: heavier, higher cost, more texture and colour variation
- Large-format porcelain tile: clean modern look, standard tile-setting techniques
- Substrate must be sound cement board or masonry before any veneer goes on
Working within firebox clearance rules during refacing
Refacing changes the material immediately surrounding the firebox opening, which means clearance-to-combustibles rules apply just as they do for a new mantel installation, particularly if the new finish includes any wood trim, mantel replacement, or combustible backing material closer to the opening than the previous finish sat.
Non-combustible materials like stone, tile and brick generally have more flexibility close to the opening than wood trim does, but the appliance's specific clearance chart still governs, especially for factory-built or gas units, and a refacing plan that changes trim or adds a wood mantel as part of the same project should confirm those clearances before installation rather than after.
Hearth extension and floor-level refacing
The hearth, the horizontal non-combustible surface extending out from the firebox opening onto the room floor, is often refaced alongside the vertical surround, particularly when a homeowner wants a continuous stone or tile look running from the wall down onto the floor. Hearth extensions have their own minimum size requirements relative to the firebox opening that must be maintained regardless of what finish material is chosen.
Raised hearths built up on a masonry or block base sometimes get lowered or reshaped during a refacing project to suit a more contemporary look, which is a larger structural change than simply changing the surface finish and should be planned and priced as its own separate scope within the broader refacing project.
Coordinating refacing with a mantel or shelf update
Because refacing changes the wall surface the mantel mounts to, any mantel bracket or ledger board needs to be planned before the finish veneer or tile goes up around it, particularly with stone veneer or tile that is difficult to cut around a bracket installed after the fact without an awkward patch.
Homeowners updating both the surround finish and the mantel in the same project generally get a cleaner result and avoid rework by having both pieces planned together from the start, with the mantel mounting hardware installed at the correct stage of the veneer or tile build-up.
Timeline expectations and living around the work
A paint or whitewash refresh can typically be completed and ready for use within a day, with normal fireplace use resuming once the paint has fully cured according to the product's specification. A full veneer or tile replacement is considerably more involved, typically requiring demolition of the old surface, substrate preparation, veneer or tile installation, and grout or sealant curing time, spread across several days depending on the size of the surround and the material chosen.
Dust and debris from demolishing an old tile or stone surface is a real consideration for a project taking place in an active living space, and containment measures, plastic sheeting, floor protection, and a clear daily cleanup routine, should be discussed before the work begins if the room needs to remain usable in the evenings during the project.
Fireplace Refacing cost in St. Catharines
Most stone or tile veneer refacing projects on a standard-sized surround land between $2,500 and $4,000 including material and installation.
| Work | Typical range | What moves the price |
|---|---|---|
| Paint or whitewash refresh over existing brick or stonesingle-day project including masonry primer and heat-rated finish coat | $350 – $700 | single-day project including masonry primer and heat-rated finish coat |
| Manufactured stone veneer refacing, standard surroundincludes substrate prep, veneer install and grout finishing | $2,200 – $4,500 | includes substrate prep, veneer install and grout finishing |
| Natural stone veneer refacinghigher material cost and additional labour for cutting and fitting | $3,500 – $7,000 | higher material cost and additional labour for cutting and fitting |
| Large-format porcelain tile surroundstandard modern surround treatment with heat-rated setting materials | $1,800 – $3,800 | standard modern surround treatment with heat-rated setting materials |
| Hearth extension refacing to match new surroundpriced separately based on hearth size and material match | $500 – $1,200 | priced separately based on hearth size and material match |
| Substrate repair prior to refacingrequired where existing tile, brick or veneer is failing beneath the surface | $300 – $900 | required where existing tile, brick or veneer is failing beneath the surface |
Ranges are estimates for planning only, not quotes. Final pricing depends on what we find on site, access, and the condition of the existing system.
What moves the price
- Whether the project is a paint refresh or a full veneer or tile replacement
- Natural stone versus manufactured stone versus tile material selection
- Condition of the substrate underneath the existing finish
- Whether the hearth extension is refaced to match the new surround
- Whether mantel or trim work is coordinated into the same project
- Overall surround size and complexity of the design pattern chosen
Want a number for your own fireplace? Send us the details and we will come back with an estimate, or call (833) 949-4153.
How the work goes, step by step
- 1
Assess the existing surface
The current finish and substrate underneath are inspected for soundness, moisture issues and compatibility with the planned new material.
- 2
Plan clearance and mantel coordination
Any changes to trim, mantel position or combustible material near the opening are checked against the appliance's clearance requirements.
- 3
Remove or prepare the old finish
Failing tile, veneer or brick surface is removed or repaired, and a sound cement board or masonry substrate is confirmed or installed.
- 4
Install new veneer, tile or paint
The chosen finish material is applied following manufacturer installation methods appropriate to that material and its proximity to the firebox.
- 5
Finish grout, joints and edges
Grout lines, mortar joints or paint edges are finished cleanly, including transitions at the hearth and any mantel mounting points.
- 6
Final inspection and cleanup
The completed surround is checked for level, finish quality and clearance compliance, and the work area is cleaned of dust and debris.
How long it takes: A paint or whitewash refresh typically takes a single day; a full stone or tile veneer refacing project generally takes three to six days depending on surround size and material.
Looking after it afterwards
- Allow paint, grout or mortar to fully cure before resuming regular fireplace use
- Clean new stone or tile surfaces with pH-neutral cleaners rather than harsh acidic products
- Reseal natural stone veneer periodically according to the specific stone type's recommendations
- Monitor new grout lines near the firebox opening for any early cracking from heat cycling
- Keep an eye on the same moisture or staining signs that may have prompted the original refacing
Mistakes we see most often
- Applying new finish material directly over a failing or cracked substrate
- Using standard interior paint instead of masonry-rated primer and heat-rated finish coat
- Overlooking clearance requirements when adding wood trim as part of a refacing project
- Choosing natural stone veneer on a wood-framed chase without checking structural load capacity
- Resuming fireplace use before paint, grout or mortar has fully cured
Questions homeowners ask
- Can you reface over existing brick?
- Frequently yes, with the right substrate preparation. Very uneven or unsound brick needs work first so the new finish does not telegraph it.
- Will refacing affect the appliance?
- It should not, provided the non-combustible zone and any air openings are respected. We verify both before finishing.
- Can any fireplace surround be refaced without touching the firebox?
- In most cases yes, since refacing addresses only the visible surround and hearth finish and leaves the firebox and flue untouched, though a substrate that is structurally compromised or a firebox with underlying damage may need repair first before new finish material can be reliably applied over it.
- Is manufactured stone veneer as durable as natural stone?
- Manufactured stone veneer is generally durable enough for typical residential fireplace surround use and costs less than natural stone, though natural stone offers greater colour depth, texture variation and, for many homeowners, a more authentic appearance that manufactured products approximate but do not fully replicate.
- How messy is a full veneer replacement project?
- Removing existing tile or stone and installing new veneer generates a meaningful amount of dust and debris, particularly during demolition, so containment measures like plastic sheeting and floor protection are typically used, and homeowners should expect some disruption to the room for the several days the project takes.
- Can refacing be combined with a mantel replacement?
- Yes, and doing so in the same project generally produces a cleaner result, since the mantel mounting hardware can be planned and installed at the correct point in the veneer or tile build-up rather than retrofitted afterward around finished stone or tile that would need to be cut and patched.
- Does refacing affect the fireplace's fire code clearance?
- It can, particularly if new combustible trim or a wood mantel is added closer to the firebox opening than the previous finish, so clearance requirements for the specific appliance type should be checked as part of planning the new surround rather than assumed to be unaffected.
- How long does new grout or mortar need to cure before using the fireplace again?
- Cure times vary by product, but most grout and thin-set mortar used in veneer or tile installations need at least a few days to reach sufficient cure strength before the surround should be exposed to firebox heat, and the specific product's technical data sheet should guide exactly how long to wait.
Nearby
Other Communities Near St. Catharines
Related work
Often Booked Together
Fireplace Repair in St. Catharines
Diagnosis and repair of fireboxes, dampers, doors, screens and hearth components.
Fireplace Installation in St. Catharines
New fireplace installation with correct venting, clearances and finished surround.
Insert Installation in St. Catharines
Gas, wood and electric inserts fitted into existing masonry openings with proper liners.
Glass Doors in St. Catharines
Custom-fitted glass doors that reduce heat loss and keep sparks in the firebox.