
Ontario Fireplace & Chimney Specialists
Fireplace Mantel Installation in Elmira
A mantel is a clearance question before it is a design question.
Every job starts with a proper look at your system — not a guess over the phone. You get a written quote before any work begins, a clear explanation of what we found, and a technician who works to manufacturer and code requirements from start to finish.
- Written quotes, no surprise charges
- Photo-backed findings after every visit
- Work performed to code and manufacturer specs
- Serving Elmira and Waterloo Region, year-round
Mantel Installation for Elmira homes
Elmira and the surrounding Woolwich farms combine nineteenth-century brick with working agricultural properties where wood stoves and outdoor furnaces do real heating work.
Farm-property appliances are often fed unseasoned wood, and the resulting creosote makes shorter sweeping intervals and camera checks a sensible baseline here.
Every appliance specifies how far a combustible mantel must sit above the opening and how far it may project. Those numbers are not advisory, and a beautiful mantel installed 50 millimetres too low is a fire hazard on a decorative object.
We check the listing first, then handle the mounting: solid blocking or masonry anchors sized to the load, levelling across an out-of-plumb wall, and scribing to the surround so the joint closes cleanly.
What the visit includes
- Appliance clearance requirement review
- Structural blocking or masonry anchor design
- Mantel levelling, scribing and secure mounting
- Surround material and hearth coordination
- Non-combustible detailing where clearances are tight
Signs you need this
- You are refinishing the fireplace wall
- The existing mantel sits lower than the listed clearance
- A heavy timber mantel needs proper structural support
- You are installing a new appliance behind an old surround
Areas we cover around Elmira
St. Jacobs · Conestogo · Floradale · Heidelberg · Winterbourne
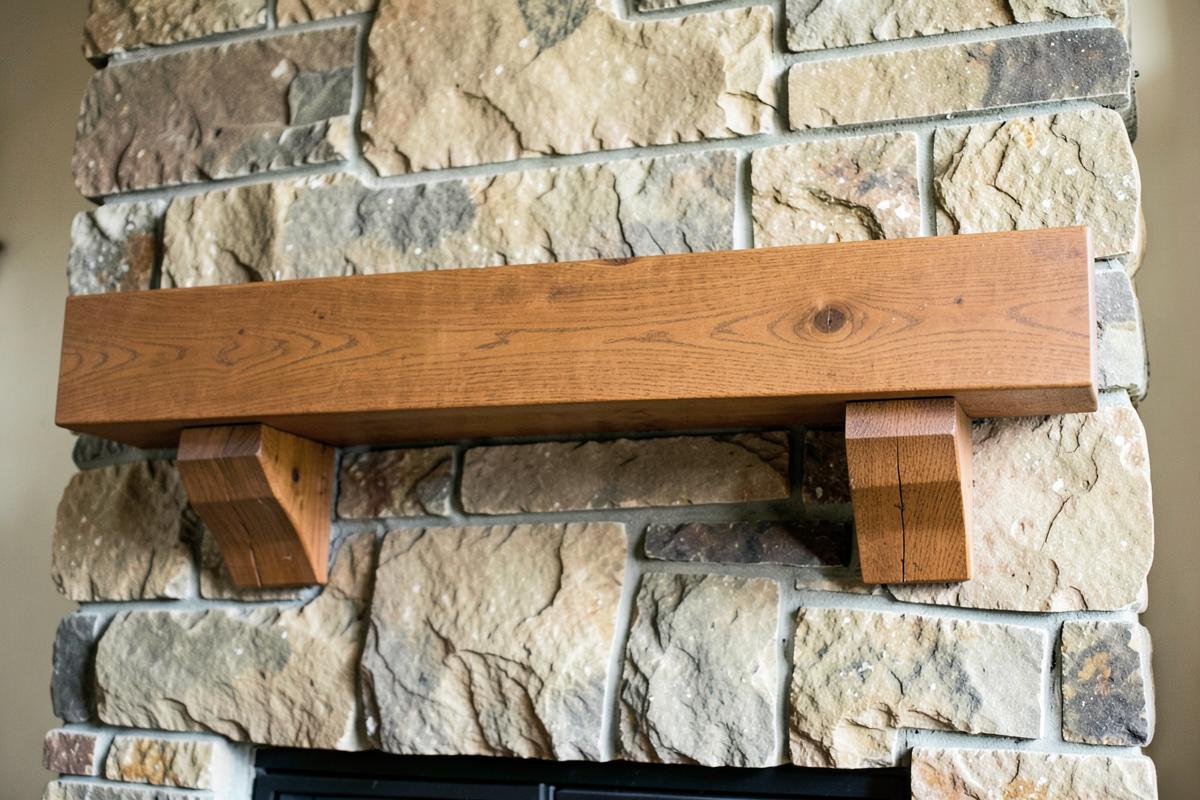
A mantel does more to define the visual character of a fireplace wall than almost any other single element, framing the firebox opening and giving a room a natural focal point for furniture arrangement, artwork, and holiday decoration. Whether it is a rustic timber beam spanning a stone surround or a painted, moulded shelf above a tiled hearth, the mantel is often the first thing a person notices when they walk into a room with a fireplace, which makes getting the proportions and mounting right worth the extra care it takes.
Mounting a mantel is not simply a matter of screwing a shelf to drywall. Most mantels sit directly above or beside an active heat source, which means fire code clearance rules govern how close combustible wood can sit to a firebox opening, and those clearances differ depending on whether the appliance below is a masonry wood fireplace, a factory-built zero-clearance unit, or a gas insert, each carrying its own listed clearance requirements from the manufacturer or from general building code guidance.
Structural mounting matters just as much as clearance. A substantial timber mantel loaded with framed photos, a television mount, or simply its own significant weight needs to anchor into solid framing or masonry rather than relying on drywall anchors alone, and getting that wrong is one of the more common and more dangerous mistakes homeowners make when installing a mantel themselves.
Clearance requirements above different fireplace types
Masonry wood-burning fireplaces typically require a greater vertical clearance between the top of the firebox opening and any combustible mantel material than factory-built or gas units do, because sustained wood fires generate more radiant heat over a longer period. General guidance calls for measurable clearance that increases as the mantel projects further out from the wall face, meaning a deep, chunky mantel shelf needs to sit higher than a slim, shallow one at the same wall.
Factory-built zero-clearance fireplaces and gas inserts each carry a manufacturer-specified clearance chart printed in the installation manual for that specific model, and those clearances are not interchangeable between brands or even between different models from the same manufacturer. Installing a mantel on a zero-clearance unit without checking that specific chart is one of the most common code violations found during resale home inspections.
When the original installation manual for an appliance cannot be located, the safer approach is to treat the unit as if it required the more conservative masonry-style clearance rather than guessing at a minimum, and to confirm find the model's specification sheet from the manufacturer before finalizing mantel height.
- Masonry wood fireplaces generally need the greatest vertical clearance
- Factory-built and gas units follow manufacturer-specific clearance charts
- Deeper, more projecting mantels require more height above the opening
- When in doubt, use the more conservative clearance figure
Material choices and how they affect placement
Solid timber mantels, whether a single rough-hewn beam or a built-up box beam made from dimensional lumber, carry real weight and typically need at least two, often three, ledger-mounted attachment points into wall studs or masonry anchors rather than a handful of screws along the back edge. Reclaimed or rough-sawn timber in particular can weigh considerably more than it appears to, and the mounting hardware needs to be rated for that load with a safety margin.
Painted or stained MDF and poplar mantel shelves, common in more traditional or transitional home styles, are lighter and easier to mount but still need solid backing at the attachment points, since a shelf that flexes or pulls away from the wall over time is almost always a sign it was fastened into drywall alone.
Stone or cast mantel surrounds, which wrap the sides of the firebox opening as well as topping it, are a different category of installation entirely, generally requiring mechanical anchoring into the masonry structure itself along with construction adhesive rated for the weight and heat exposure involved, and are typically installed by a mason or stone specialist rather than through a standard carpentry mantel process.
Finding and using structural backing
On a drywall-clad chase around a factory-built fireplace, finding solid backing usually means locating the studs framing the chase opening and, where the mantel spans wider than the stud spacing allows for direct attachment, installing a ledger board fastened into as many studs as the span reaches before the mantel shell is slipped over or fastened to that ledger.
On a masonry surround, backing means drilling into the brick or stone itself with masonry anchors rated for the anticipated load, spaced according to the mantel's total weight and span, with particular attention paid to mortar joint condition since anchors set into deteriorated mortar rather than sound brick or stone will not hold reliably over time.
A French cleat mounting system, where an angled ledger strip on the wall interlocks with a matching strip on the back of the mantel, is a common and effective method for both wood-framed and masonry walls because it distributes the load along the full cleat length rather than concentrating it at a few screw points, while still allowing the mantel to be lifted off later for any wall work behind it.
Working around existing masonry and stonework
Adding a mantel to an existing stone or brick surround years after the original fireplace was built requires working around whatever mortar joint pattern and stone face texture is already there, since drilling into natural stone risks cracking it if the bit catches an uneven grain or a hidden void behind the face. A careful installer will identify mortar joints as anchor points wherever possible rather than drilling through the stone itself.
Where the existing masonry face is uneven, shims or a scribed backer board behind the mantel bracket allow the shelf to sit level and flush against the wall even when the stone or brick surface it is mounted to is not perfectly flat, which is the norm rather than the exception on older Ontario stonework.
- Locate mortar joints as preferred anchor points over solid stone
- Use scribed backers or shims to correct for uneven stone faces
- Test anchor pull-strength before final fastening on older masonry
Design proportions that read well in a room
A mantel shelf that sits too high above a firebox opening relative to the room's ceiling height tends to look disconnected from the fireplace it is meant to crown, while one mounted at the minimum legal clearance can end up looking cramped against the opening below it, particularly on a tall firebox. A width extending six to twelve inches beyond each side of the firebox opening is a common visual guideline that keeps the mantel reading as a frame around the opening rather than an oddly narrow shelf floating above it.
Depth and thickness of the mantel shelf should scale with the room, since a heavy timber beam mantel can overwhelm a small room with low ceilings, while a slim, shallow shelf can look undersized against a tall stone chimney breast in a great room. These are aesthetic judgment calls more than technical rules, but they matter enough to homeowners' satisfaction with the finished look that they are worth discussing before material is ordered.
Coordinating mantel installation with a full surround renovation
Mantels are frequently installed as part of a broader fireplace surround update, alongside new tile, stone veneer, or a painted brick refresh, and sequencing matters in that scenario since the mantel bracket or ledger location often needs to be set before the finish material goes on around it, particularly with tile or thin stone veneer that would need to be cut around a mantel bracket installed afterward.
Where a homeowner is planning both a surround update and a mantel in the same project, having the same contractor or a coordinated pair of trades handle both pieces avoids the common problem of a mantel bracket landing exactly where a tile grout line or stone joint was meant to fall.
Inspection and sign-off considerations
Because mantel placement intersects directly with fire clearance requirements, a mantel installed above a gas insert or factory-built unit should be checked against that unit's certified clearance chart before the work is considered finished, and it is reasonable for a homeowner to ask to see that chart or have the clearance figure explained rather than simply told the mantel is fine.
For homes preparing for resale, a mantel installed without documented clearance compliance is a common flag during a pre-listing inspection, and correcting it after the fact, by moving the mantel or adding a heat shield, is considerably more disruptive than getting the clearance right during original installation.
Fireplace Mantel Installation cost in Elmira
A typical mantel installation project, including materials and mounting labour, runs between $700 and $1,200 for most Ontario homes.
| Work | Typical range | What moves the price |
|---|---|---|
| Standard MDF or painted wood mantel, supply and installtypical shelf width up to six feet on drywall-clad chase | $450 – $900 | typical shelf width up to six feet on drywall-clad chase |
| Solid timber or reclaimed beam mantelincludes heavier-duty ledger mounting for the added weight | $800 – $1,800 | includes heavier-duty ledger mounting for the added weight |
| French cleat mounting system upgradeadded labour and hardware for a removable cleat mount | $120 – $250 | added labour and hardware for a removable cleat mount |
| Mantel installation on existing stone or brick surroundincludes masonry anchor drilling and finish patching | $650 – $1,400 | includes masonry anchor drilling and finish patching |
| Custom-built mantel to specific dimensionsbuilt off-site to match room proportions and existing millwork | $1,200 – $2,800 | built off-site to match room proportions and existing millwork |
| Clearance assessment and documentation onlyfor homeowners installing their own mantel who need a clearance check | $150 – $250 | for homeowners installing their own mantel who need a clearance check |
Ranges are estimates for planning only, not quotes. Final pricing depends on what we find on site, access, and the condition of the existing system.
What moves the price
- Material weight and type, from painted MDF to solid reclaimed timber
- Whether the mounting surface is drywall-clad framing or solid masonry
- Mantel width and whether custom fabrication is required
- Fireplace type below, which determines the clearance the mantel must respect
- Coordination with a broader surround renovation happening at the same time
- Finish patching or paint touch-up needed around the new mounting points
Want a number for your own fireplace? Send us the details and we will come back with an estimate, or call (833) 949-4153.
How the work goes, step by step
- 1
Confirm clearance requirements
The fireplace type below is identified and its required clearance to combustibles is confirmed before any mantel height is finalized.
- 2
Locate structural backing
Wall studs, ledger points or masonry anchor locations are identified and marked for the mantel's attachment hardware.
- 3
Level and mark placement
The mantel's height and width position are marked on the wall, checked level and centred relative to the firebox opening.
- 4
Install mounting hardware
A ledger board, French cleat or masonry anchors are installed and load-tested before the mantel shell is placed.
- 5
Mount and secure the mantel
The mantel is set onto its mounting hardware, checked for level and snugness against the wall, and secured permanently.
- 6
Finish and touch up
Any exposed fasteners are concealed, gaps at the wall are caulked or filled, and paint or stain touch-up is applied where needed.
How long it takes: A standard mantel installation typically takes two to four hours on site once materials are on hand; custom-built mantels require additional lead time for fabrication before installation day.
Looking after it afterwards
- Avoid hanging heavy items from the mantel edge that were not accounted for in the original load calculation
- Recheck fastener tightness after the first full heating season of thermal cycling
- Keep flammable decor items outside the appliance's rated clearance zone even with a mantel in place
- Dust and clean wood mantels with products appropriate to the specific finish to avoid dulling or discolouration
- Confirm any later renovation work near the mantel does not compromise the original anchor points
Mistakes we see most often
- Mounting a mantel using drywall anchors alone instead of structural backing
- Ignoring the manufacturer's clearance chart for a factory-built or gas unit
- Choosing a mantel width that looks disproportionately narrow against the firebox opening
- Drilling directly into decorative stone instead of using mortar joints as anchor points
- Installing the mantel before finalizing surrounding tile or stone veneer layout
Questions homeowners ask
- How high does a mantel have to be?
- It depends on the appliance and how far the mantel projects. Gas and wood appliances both publish a table, and we work from that unit's numbers.
- Can a reclaimed beam be used?
- Often yes, with attention to weight, moisture content and clearance. Heavy timber needs blocking, not just masonry screws into brick.
- How high above the firebox should a mantel be mounted?
- The correct height depends on the specific fireplace type and how far the mantel projects from the wall, since masonry wood fireplaces generally require greater clearance than gas or factory-built units, and a mantel that projects further out from the wall needs to sit correspondingly higher, so the manufacturer's clearance chart or general masonry clearance guidance should be checked before finalizing the height.
- Can a heavy timber mantel be mounted on drywall alone?
- A heavy timber mantel should not rely on drywall alone for support, since the combined weight of the timber and anything later hung or placed on it typically exceeds what drywall anchors are rated to hold, and the mounting should instead reach solid wall studs, a ledger board, or masonry anchors depending on the wall type.
- Is a French cleat mounting system better than direct screws?
- A French cleat spreads the mantel's weight along the full length of the cleat rather than concentrating it at a few screw points, and it also allows the mantel to be lifted off the wall later for any work behind it, which makes it a practical choice for heavier mantels or situations where future access is likely.
- Does adding a mantel affect a fireplace's fire code compliance?
- It can, since a mantel installed closer than the required clearance to a firebox opening is a compliance issue regardless of how solidly it is mounted, which is why clearance should be checked against the specific appliance below before the mantel height is finalized rather than assumed based on how another fireplace in the neighbourhood was done.
- Can a mantel be added to a stone fireplace built without one originally?
- Yes, mantels are commonly added to existing stone or brick surrounds years after original construction, typically by anchoring into mortar joints rather than the stone face itself and using shims or a scribed backer to account for any unevenness in the existing masonry surface.
- What is the typical lead time for a custom-built mantel?
- Custom mantels built to specific room dimensions or matched to existing millwork typically take a few weeks from order to delivery before installation can be scheduled, which is longer than a stock-size mantel that can often be installed within days of ordering.
Nearby
Other Communities Near Elmira
Related work
Often Booked Together
Fireplace Repair in Elmira
Diagnosis and repair of fireboxes, dampers, doors, screens and hearth components.
Fireplace Installation in Elmira
New fireplace installation with correct venting, clearances and finished surround.
Insert Installation in Elmira
Gas, wood and electric inserts fitted into existing masonry openings with proper liners.
Glass Doors in Elmira
Custom-fitted glass doors that reduce heat loss and keep sparks in the firebox.