
Ontario Fireplace & Chimney Specialists
Chimney Flashing Repair in Richmond Hill
Most 'chimney leaks' are actually flashing leaks.
Every job starts with a proper look at your system — not a guess over the phone. You get a written quote before any work begins, a clear explanation of what we found, and a technician who works to manufacturer and code requirements from start to finish.
- Written quotes, no surprise charges
- Photo-backed findings after every visit
- Work performed to code and manufacturer specs
- Serving Richmond Hill and York Region, year-round
Flashing Repair for Richmond Hill homes
Richmond Hill spans several building eras, so a street can hold 1980s factory-built wood fireplaces and current-generation direct-vent gas units within a few doors of each other.
That range means diagnosis before quoting is essential here, since parts availability varies enormously between appliance generations and dictates whether a repair is realistic.
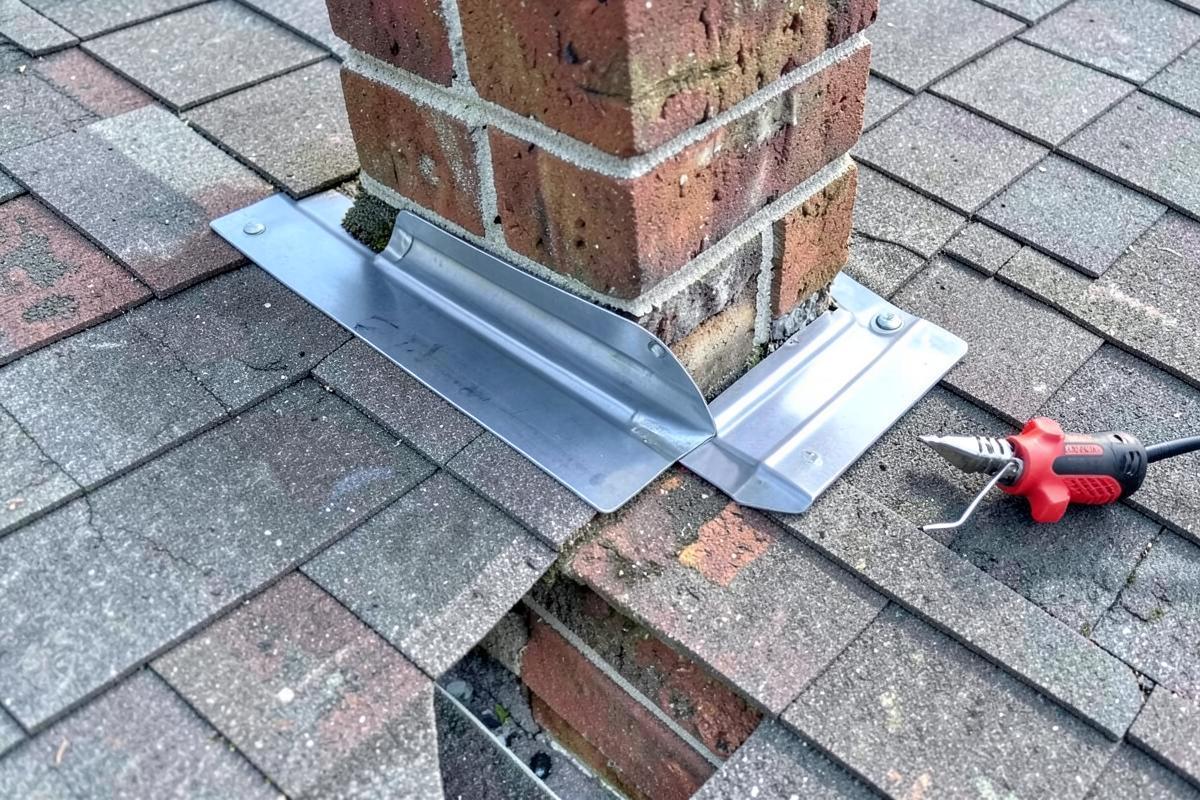
The joint between a chimney and a roof plane moves in two directions with temperature and moisture. Flashing accommodates that movement in layers: step flashing woven into the shingle courses, and counter-flashing let into a mortar joint above it so water cannot get behind.
Failures usually come from caulk used in place of counter-flashing, or from the sealant reaching the end of its life. We cut a proper reglet, install new metal, and reserve sealant for the small role it is actually good at.
What the visit includes
- Inspection of the full chimney-to-roof interface
- New step flashing woven into shingle courses
- Counter-flashing let into a cut mortar reglet
- Cricket installation on wide chimneys where needed
- Interior verification after the repair
Signs you need this
- Ceiling stains appearing only after driving rain
- Peeling paint or damp drywall beside the chimney breast
- Visible tar smears where flashing should be
- Rusted or lifted metal at the roofline
Areas we cover around Richmond Hill
Oak Ridges · Jefferson · Bayview Hill · Mill Pond · Crosby
Flashing is the quiet part of a chimney that does most of the work of keeping a house dry. It is not decorative and it is not optional; it is a layered metal system built to carry water off the roof and around the masonry rather than letting it find the gap between two very different building materials. When it fails, the damage rarely shows up where the leak actually starts, which is why so many homeowners chase a phantom roof leak for a season or two before anyone looks at the chimney joint.
Ontario roofs go through more thermal cycling than most people realize. A chimney and a roof deck expand and contract at different rates, shingles lift and settle with wind and ice, and a joint that was watertight in September can be letting water in by the first thaw. Flashing has to tolerate that movement indefinitely, which is why it is built as overlapping metal rather than a single bead of anything applied once and left alone.
This service covers diagnosing where water is actually entering, removing failed metal and sealant, and rebuilding the joint the way it should have been built the first time: step flashing woven into the shingle courses and counter-flashing set into the masonry above it. Done properly, it is a repair that should not need attention again for a very long time, and it is one of the few chimney repairs that pays for itself by preventing much larger drywall, insulation, and framing damage.
How a proper flashing system actually works
A correctly built chimney flashing assembly is really two systems working together. Step flashing is a series of small L-shaped metal pieces, one per shingle course, tucked under the shingle above and over the one below, forming a shingled path that sheds water down and away from the chimney on both sides. Counter-flashing is a separate strip of metal set into a cut mortar joint or reglet in the brick, bent down over the top edge of the step flashing so water running down the brick face cannot get behind the step flashing at all.
The two pieces overlap but are never fused together, because the roof and the chimney move independently of each other over the seasons. A chimney sitting on its own footing settles differently than a roof structure resting on wood framing, and a rigid single-piece flashing system would eventually crack or pull loose at exactly the point where movement concentrates. The two-part design is what lets the whole assembly last decades instead of years.
On the uphill side of a wide chimney, a cricket, sometimes called a saddle, is often required. This is a small peaked structure built to split water and debris around the chimney rather than letting it dam up against the back wall, which is one of the most common places for a slow leak to develop unnoticed for years.
Why Ontario winters are hard on flashing
Ontario's climate puts flashing through a demanding annual cycle. Ice and meltwater sit against the base of the chimney through freeze-thaw periods in late winter and early spring, testing every seam and fastener repeatedly rather than just once during a heavy summer storm. Ice damming along the eaves can back water up under shingles and toward the chimney joint from an unexpected direction, which is one reason flashing that looked fine in a dry-weather inspection can still be the source of a spring leak.
Snow load and repeated freeze-thaw cycling also work mechanically on caulking and sealants, which harden, shrink, and crack faster in this climate than in milder regions. A bead of sealant that might last a decade somewhere with a gentler winter can fail within a couple of seasons here, especially on a south or west-facing slope that swings through more freeze-thaw cycles per winter due to daytime sun exposure.
Wind-driven rain is the other Ontario-specific factor worth naming. A joint that sheds water fine under calm rainfall can still take on water when wind pushes rain sideways and upward under a lifted shingle edge, which is part of why flashing repairs sometimes need a storm to reveal a weakness that a dry visual inspection missed entirely.
Materials and when each one is used
Galvanized steel, aluminum, and copper are the three metals commonly used for flashing in this region. Galvanized steel is durable and cost-effective and is the most common choice on standard residential jobs. Aluminum is lighter and resists corrosion well but should never be paired directly against masonry containing certain mortars without a separating layer, since some mortar chemistry can react with bare aluminum over time. Copper costs more up front but develops a protective patina and often outlasts the roof around it, which makes it a common choice on higher-end or heritage homes where longevity and appearance both matter.
Sealant still has a role, but a narrow one: it is meant to seal the reglet where counter-flashing meets the cut mortar joint, not to bridge a gap where metal should be doing the work. A high-quality polyurethane or masonry-grade sealant in that specific location, reapplied periodically, is appropriate. Sealant smeared across a wide gap between roof and brick as a stand-alone fix is a sign of a rushed prior repair, not a legitimate flashing method.
- Galvanized steel step and counter-flashing, the standard choice for most homes
- Aluminum flashing, lightweight but requires isolation from certain mortars
- Copper flashing, higher cost with long service life and a distinctive patina
- Reglet-cut counter-flashing set into raked mortar joints
- Surface-mounted counter-flashing brackets, used only where a reglet cut is not practical
Code context and why the interface matters structurally
The Ontario Building Code and general roofing standards both address flashing at roof penetrations because this joint is treated as a known weak point rather than an afterthought. The expectation is a layered, mechanically shingled assembly rather than sealant alone, and inspectors and insurers alike tend to view chimney leaks that trace back to missing counter-flashing as a maintenance failure rather than an unavoidable event.
This matters beyond the leak itself. Water that gets past flashing does not stay at the roofline; it tracks down the inside of the chimney chase or along framing members, soaking insulation, staining ceilings, and in older homes sometimes reaching electrical runs near the chimney chase. A flashing failure left unaddressed for a full season can turn a two-hour repair into a drywall and insulation replacement project, which is the practical reason this work is worth doing promptly once a leak is suspected.
What a flashing inspection tells you
A flashing inspection is really a search for specific failure patterns: lifted or curled step flashing pieces, counter-flashing that has pulled out of its mortar joint, sealant that has shrunk away from the brick leaving a visible gap, and rust-through on older galvanized metal. Each of these tells a slightly different story about how the water is getting in and how urgent the fix is.
Interior evidence matters just as much as what is visible on the roof. A brown ring on a ceiling that only appears after wind-driven rain, damp insulation found during an attic check, or a musty smell near the chimney breast all point toward a flashing failure even when the roof-level view looks reasonable from the ground. This is part of why a proper assessment includes checking both the exterior assembly and the interior evidence of water intrusion before recommending a repair scope.
Repair versus full replacement
Not every flashing problem needs a full teardown. If the step flashing is sound but the counter-flashing has failed or was never installed correctly, the counter-flashing alone can often be replaced without disturbing the shingles, which keeps cost and disruption down. If the step flashing itself is rusted through, poorly lapped, or was installed with nails through the flat rather than properly integrated with the shingle courses, a full rebuild of both components is the only way to actually solve the problem rather than patch it again next year.
Age and condition of the surrounding roof also factor in. If the shingles around the chimney are near the end of their service life, it often makes more sense to combine flashing replacement with the roofing work rather than install new flashing under shingles that will be torn off again in a year or two. A contractor doing this work honestly will flag that timing consideration rather than just repairing what is in front of them.
Insurance, resale, and documentation
Water damage claims tied to chimney flashing are a common source of dispute with home insurance, because insurers often distinguish between sudden, accidental water damage and gradual leakage tied to deferred maintenance. A documented flashing repair, with photos of the failed condition and the completed work, gives a homeowner something concrete to point to if a related claim ever comes up, and it is a reasonable thing to keep on file alongside other home maintenance records.
At resale, a home inspector will almost always check chimney flashing, and visible gaps, rust, or sealant smeared in place of proper metal are a common item on inspection reports that can slow down or complicate a sale. Addressing flashing proactively, well before a listing goes up, tends to be far less stressful and less costly than negotiating a credit at closing over a leak that a buyer's inspector flagged.
Chimney Flashing Repair cost in Richmond Hill
Most Ontario homeowners pay somewhere around $850 to $1,100 for a complete step and counter-flashing rebuild on a standard single-storey chimney.
| Work | Typical range | What moves the price |
|---|---|---|
| Counter-flashing replacement only, single chimneystep flashing left in place if sound | $425 – $650 | step flashing left in place if sound |
| Full step and counter-flashing rebuildtypical single-storey masonry chimney | $750 – $1,350 | typical single-storey masonry chimney |
| Cricket or saddle addition on wide chimneydepends on chimney width and roof pitch | $450 – $900 | depends on chimney width and roof pitch |
| Copper flashing upgradematerial premium over galvanized steel | $1,100 – $2,200 | material premium over galvanized steel |
| Sealant renewal at reglet onlyshort-term measure, not a substitute for metal repair | $180 – $310 | short-term measure, not a substitute for metal repair |
| Two-storey or steep-pitch access surchargestaging, ladders, or lift equipment | $150 – $400 | staging, ladders, or lift equipment |
Ranges are estimates for planning only, not quotes. Final pricing depends on what we find on site, access, and the condition of the existing system.
What moves the price
- Whether only counter-flashing needs replacing or the full step flashing assembly must be rebuilt
- Chimney width, which affects material quantity and whether a cricket is required
- Roof pitch and storey height, which change access and staging requirements
- Metal choice between galvanized steel, aluminum, and copper
- Condition of surrounding shingles and whether roofing coordination is needed
- Extent of interior water damage requiring separate repair
Want a number for your own fireplace? Send us the details and we will come back with an estimate, or call (833) 949-4153.
How the work goes, step by step
- 1
Interior and exterior assessment
We check the attic and ceiling near the chimney chase for existing water evidence, then examine the full roofline joint from the roof surface for lifted, rusted, or missing flashing components.
- 2
Diagnosis of the leak path
Rather than assuming the visible gap is the source, we trace water staining and metal condition to confirm exactly where water is entering before removing anything.
- 3
Removal of failed materials
Old counter-flashing is cut out of its mortar reglet, and step flashing pieces are lifted from under the shingle courses without damaging surrounding shingles unnecessarily.
- 4
Reglet cutting
A clean mortar joint is cut to receive new counter-flashing, giving the metal a secure mechanical seat rather than relying on surface-applied brackets or sealant alone.
- 5
New flashing installation
Step flashing is woven back into the shingle courses piece by piece, and counter-flashing is set into the reglet, bent down over the step flashing, and sealed at the joint.
- 6
Interior re-check after installation
Where an active leak was reported, we verify the repair addresses the documented path, and note any interior drywall or insulation repair that falls outside this scope.
How long it takes: Most flashing repairs are completed in a single visit of three to six hours, depending on chimney size and whether a cricket needs to be built.
Looking after it afterwards
- Have the flashing visually checked during your annual chimney inspection rather than waiting for a visible leak
- Watch for ceiling or attic staining near the chimney after heavy wind-driven rain and report it promptly
- Keep gutters and downspouts near the chimney clear so water is not backing up against the roof-chimney joint
- Avoid pressure-washing the roof or chimney, which can force water under flashing edges
- Have flashing checked after any roofing work done for unrelated reasons, since it is sometimes disturbed during shingle replacement
Mistakes we see most often
- Relying on caulking to bridge a gap where step and counter-flashing should be doing the work
- Replacing shingles around a chimney without addressing worn flashing underneath
- Assuming a roof leak near a chimney is always a shingle problem rather than checking the flashing first
- Choosing bare aluminum flashing against incompatible mortar without an isolating layer
- Delaying repair over a winter because the leak seems minor, allowing hidden insulation and framing damage to spread
Questions homeowners ask
- Do I need a roofer or a chimney company?
- Either can flash a chimney, but the diagnosis matters more than the trade. If the water is coming down the flue rather than around it, new flashing will not fix anything.
- What is a cricket?
- A small sloped structure built behind a wide chimney on a sloped roof, so water and snow are diverted around it rather than pooling against the masonry.
- How do I know if my leak is flashing and not the roof itself?
- Leaks that appear only near the chimney, especially after wind-driven rain rather than every rainfall, usually point to flashing rather than a general roof failure. An inspection that checks both the roof surface and the attic side of the chimney chase can confirm the source before any repair work starts.
- Can flashing be repaired without removing any shingles?
- Counter-flashing alone can sometimes be replaced without disturbing shingles, since it sits in the mortar joint above the step flashing. A full step flashing rebuild does require lifting the surrounding shingle courses, which is done carefully to avoid unnecessary shingle damage.
- Is copper flashing worth the extra cost?
- Copper resists corrosion very well and often lasts longer than the roof itself, which makes it attractive on homes where longevity or appearance matters, such as heritage properties. For most standard homes, galvanized steel performs reliably at a lower cost.
- Will my home insurance cover flashing-related water damage?
- That depends on your policy and whether the damage is classified as sudden and accidental versus gradual deterioration from deferred maintenance. Keeping records of chimney inspections and any completed flashing repairs is useful documentation if a claim situation ever arises.
- How often should chimney flashing be checked?
- An annual visual check, ideally alongside a broader chimney inspection, catches most developing problems like lifted edges or shrinking sealant before they become active leaks. Flashing exposed to a harsh roof orientation or heavy tree cover may benefit from more frequent checks.
- Does a cricket need to be added to every wide chimney?
- Not necessarily, but chimneys wider than roughly 24 to 30 inches measured across the slope are generally at higher risk of water and debris pooling on the uphill side without one. A roof-level inspection can confirm whether your specific chimney width and pitch warrant adding one.
Nearby
Other Communities Near Richmond Hill
Related work
Often Booked Together
Chimney Sweeping in Richmond Hill
Full mechanical sweep of the flue, smoke chamber and firebox with containment and photos.
Chimney Repair in Richmond Hill
Targeted repairs to crowns, caps, mortar joints, flashing and liners.
Chimney Liner in Richmond Hill
Stainless steel and cast-in-place relining sized to the appliance being vented.
Chimney Cap in Richmond Hill
Stainless caps and multi-flue covers that keep out rain, snow, animals and embers.